Monday, April 29, 2013

Sofa That I Want Redone.

90 inches long by 32 inches deep by 27 inches high


The chair I would like the new fabric to coordinate with.

Sunday, April 28, 2013

Burda 06-2011-111 Zipper Side Pocket Tutorial

I made another pair of Burda 06-2011-111 shorts.  I have temporarily misplaced the magazine, but I had the  pattern that I traced with my adjustments and in my previous makes of these shorts, I did not place the invisible zipper and pocket on the same side.  I remember the instructions being incredibly confusing, so I thought I would post how I did it.  I did make one mistake that doesn't affect the tutorial and if you figure out what it is, you get a bonus prize (to be determined at the time someone actually figures it out).

First I sewed the front to back at the inseams and sewed the sides together through the crotch as is standard.

Then I serged the edges of the four pocket pieces and four sides of the shorts.  I placed the first pocket piece right side to the right side of the front side of the shorts.  I marked a line on the pocket piece for the side seam of the shorts will be.


I sewed along the drawn seam line making a 90 degree turn at the bottom of the pocket, and I cut to the corner of the right angle.

I flipped the pocket to the wrong side and pressed.  This fabric doesn't press well.

I then turned the shorts so that the wrong side was up and placed the other pocket side right sides together and sewed around the pocket keeping the front of the shorts free of the stitching.

Turning the shorts over, this is how it looks.  That is, the pocket is now attached to the front piece of the shorts and you can now treat it as one piece.

Sew the waistband pieces together and attach them to the shorts.

Sew the invisible zipper to the shorts front along the seam line in front of the pocket.

Sew the invisible zipper to the back of the shorts.

Then you have the finished invisible zipper (here half open so that you can see it more clearly) and the side pocket all on the same side.  I also understitched the pocket so that it wouldn't flip out since this fabric doesn't press well.

Friday, April 26, 2013

Day of Spoiling

Today was a day of ups and downs.  I'm focusing on the ups because I feel very spoiled.

Every year, my mom asks me what I want for my birthday and Christmas and I have no answer.  Then she asks Q and he has the same answer.  After a number of years of this my mother decides she needs to buy me something to make up for the missed years of gifts and I get something really, really good and she says it's for both of us, which this time translates to big gift for me, and Q gets things as I make them using it.  This is what I drove to Austin to pick up today.
That is a heavy duty sewing machine and heavy duty serger.  Cool, huh?  Remember my thick cloak that I said I wasn't going to every finish?  Now, I sort of feel like I have to.

While picking this up, I managed to lock the keys to the van in the car.  Then I panicked and realized that I have no idea what to do in this situation.  I have always worried about locking the keys in the car with the girls in there and I knew I would just break a window in that case, but as the girls, my MIL, and I were all outside the car, this wasn't really necessary.  After calls to my mom and Q and USAA, it was straightened out and we got back into the car and went to eat and a visit to Austin TexStyles, where I picked up some cool fabrics.
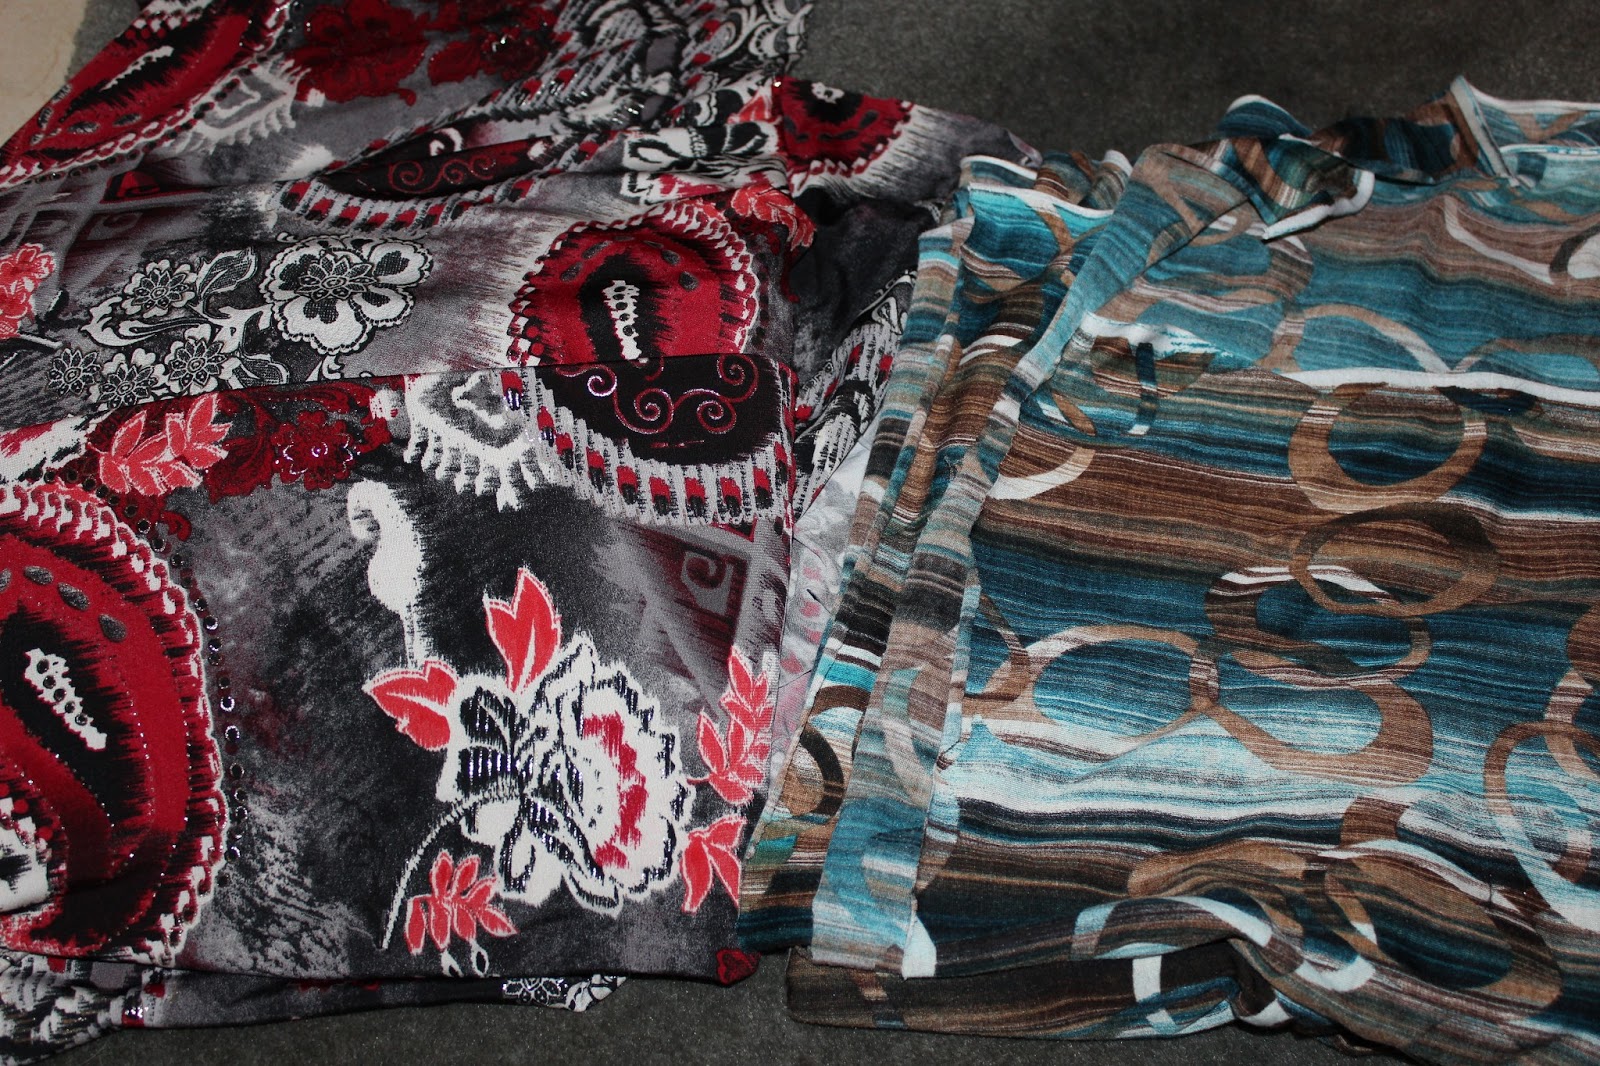
 For myself, I picked out two lovely knits.  The ITY knit on the left I plan on making a wrap dress and the cotton jersey on the right a blouse of some sort.
 The nerdlet picked this woven out.  I'm going to try to find an Ottobre dress pattern for her that suits it and if not, it will be the standard dress that is usually made for her.

Then after a congested drive back into San Antonio where Fiesta is going on, we returned to my in-laws and my FIL gave me a new lens for my camera.  My MIL and I played with her new generic ruffler for the Brother which is extremely similar to the brand name one that costs four times as much (and which I own) and I brought the girls home.

I found on my doorstep a box from my cousin, who sent me fabric!
Those top two left fabrics are stretch denim, which should be perfect for trying out my new machine, and is also good because I am in dire need of shorts.  The cupcake fabric is a woven of unknown content, but I suspect it's a cotton poly mix based on the feel and the wrinkle resistance.  The last two are ITY knits and I think that I might just stack my next knit pattern choices with these and make two of whatever is next because I know that I'll enjoy wearing these regardless of what they turn into.

Now, I need to pack my previously planned projects and replace them with new ones.

Thursday, April 25, 2013

McCall's 6035 Version 3

I made my last version of McCall's 6035 for a while, but I'll likely make more later as I really like this, though I know it probably isn't fashionable.  Anyone that knows me or has been following this blog for a while has likely already figured out that I'm not exactly in tune with the height of fashion.  It isn't exactly a new thing for me.


I actually didn't care that much for this fabric (another Tutti Frutti) when I bought it, but it matched the others and I'm making a sort of lavender set for the next set of family pictures. Now, though, I've actually become quite fond of it.

When I made my next set of adjustments, I put a little tuck in the pattern under my breast.  I made a note of where the bottom of my breast was and I took a little out of the pattern.  I took less than 1/2 inch and it made a huge difference.  I also added about an inch to the center piece at the same spot to preserve the right length.

The new pattern piece is on top.

This is at an angle that emphasizes what this change does.  I was a little worried that I would ruin the shirt, but I think it was an experiment that turned out well.  
 

Monday, April 22, 2013

Dragon Bag

My MIL wanted a bag pattern and I found this one for her.  I was planning on using it for the bag I made with the dragons I got from my MIL, but I decided that I wanted to change it a little.  I wanted it to be a little sturdier and have more room in the bottom part.  My changes are really pretty minimal.  I made the main fabric out of one piece so that there isn't a seam at the bottom.  I changed the lining so that none of my seams lined up with the outer bag piece.  The final change was to sew in thick Peltex stabilizer in the bottom to give it a base at the bottom of the bag.

This is the finished bag from the bottom view.

My original plan.
 

After ironing the interfacing onto the outer bag fabric, I used HeatnBond.  I chose the wrong one and couldn't sew through it.  I was planning on stitching around at this point with a satin stitch, but I'll likely cover the edges with paint later instead.

I did make my straps differently in that I simply folded it in half and then folded the insides in.

 Then I pressed the straps and topstitched on both sides.

The finished bag with a skilled and large tupperwear inside to show the depth.

The other side.


Sunday, April 21, 2013

McCalls 6035 Another version and size

I finished the 18D for our babysitter that I made that was a little snug for me to wear in public.  Ideally, I think her size would be a 18C or more likely a 16D, but I didn't actually measure her.  I finished the bodice because I didn't want to waste the bodice and I had enough fabric for another collar, sleeves, and cuffs, and I thought it would be fairly close to her size.  This is the same fabric as my previous shirt, but the pictures are better and you can see the fabric better.

I made a small mistake with one of the sleeves and when I went to trim, I ended up cutting a fairly large triangle out of the underside of the sleeve.

Nice, huh?  My first thought was to just make the shirt sleeveless and just finish the arm openings, but I decided that I really wanted to finish the shirt with the sleeves.  At that point, I could either use a different fabric for the sleeves or I could patch the sleeve.  I decided to patch it.  So I'm going to show you how I did that.

First, I found a scrap slightly larger than my hole.

Normally I would interface the area, but I didn't want the sleeve to be stiff and uncomfortable.  I tried to match up the grain and pattern, not because it shows because it doesn't, but so that the sleeve would still move naturally.  I sewed it very close (about 1/16 of an inch) to the cut.

Then I trimmed the inside of the sleeve close to my stitching.

I put the machine on a short, wide zigzag stitch.

I zigzagged over all the stiches and trimmed the sleeve to be the same size as before I butchered it.

Here is what it looks like sewn in.

And how it sits when on.  It cannot be seen when her arm is down.

Friday, April 19, 2013

McCall-s 6035

This is McCall's 6035.  It's one of those patterns that has different cup sizes.  Those cup sizes are A/B, C, and D and I'm a DDD, so it wasn't like I shouldn't have known that I needed to adjust the pattern.  I thought maybe I could make the 18 D instead of adjusting the 16 to a DDD, but it didn't work out and I had to draw out the pattern with more adjustments.
 I made some of my normal adjustments, but not all of them.  I took out an inch in length above the bust and I straightened out the shoulders 1/2 inch.  While I could squeeze into it, it would not be pretty, so the babysitter is going to get a shirt out of it (though I'll have to cut out some sleeves and a new collar for her shirt.  

I didn't do a typical FBA to this at all.  Because I really just needed about two inches at the bust, I redrew the front side panel to come out an inch further without adding any length.  I just marked an inch further and changed the slope to reach that point.  I also doubled the buttons.  The fabric is that tiny pink and white plaid cotton from fabricmartfabrics.com.  This was the result.  


The arms are a little tight and I think this is because I took a vertical inch out of them and they hit a little higher than they would otherwise.  It's a little loose around my torso (as in who needs over 5 inches of ease?), but I actually like that as I think when it's more fitted that the size of my chest is a little too obvious.  I think the wrinkles are mostly because of my trying to take the picture one handed and still face forward.

When I make this again and I will, I only plan to change a little.  I most likely will choose a different collar.  If I use the same sleeve, I'll add 1/2 inch to the width around.  I might change the curve of the princess seam right above the chest, but I actually think the fit is pretty good.  

Thursday, April 18, 2013

The News

Everyday I get more and more frustrated with the media.  I wish there was a channel/website for me for news.  It would have bills considered and whether they passed or failed.  It would tell me who voted for what and maybe their reasoning.  It would give me information on how to help certain causes without my having to search through pages of a google search I did myself.  It would tell me when people were killed or disappeared, especially overseas.  It would tell me what books are coming out and not just one or the expected bestseller and when.  After any politician's quote it would do a snippet about how true it was (in the vein of politifact and not snopes).  There would be complete science update each week that included all areas of science.  It would still give me the weather, classifieds, street projects, and the like.  It would tell me of the events and things to see and not focus on television and movies.  It would not mention any personal items or opinions of actors or actresses.  My news would probably include patterns and reviews of sewing machines, but I realize that isn't likely to be popular enough to make any cut.  It would have news articles about wonderful people doing wonderful things.  I know that there is a myriad to choose from that the media is currently choosing none.  It seems that each day the media veers further and further away from what I want and into the abyss.

Wednesday, April 17, 2013

Pre-writing worksheets

I recently read this post on http://pudgeandzippy.blogspot.com/, which is a neat little blog by a mom of two adorable little ones with Down syndrome.  I'm always on the lookout for things that will help my bear cub catch up or stay caught up with her peers and at her most recent ARD meeting, the bear cub's teacher mentioned specifically that we needed to work on her prewriting skills, so I made these worksheets.

It was really simple.  I just took card stock, drew out the lines, and cut them out 1/4 inch for the shape.  Then, I plan on laminating and she can practice her line drawing.  I also plan on making her name and possibly some squiggle/worm like shapes.  The nerdlet generously donated from her stickers to mark the lines.


I think it's a wonderful way to work on pre-writing skills and I imagine Darth Baby will get a lot of use out of them, too (if I can get her to stop just drawing on herself and her sisters).

Sunday, April 14, 2013

Simplicity 2265

I bought Simplicity 2265 recently at one of the pattern sales, where because I bought 7 patterns for $1 each, I supposedly saved $95, except that I wouldn't probably buy any patterns at full price as I often have to do a lot of work to modify them to fit and would likely draft them.  

I decided to make view B, which actually in the pattern directions seems kind of like an afterthought.  There isn't even a picture of it in the pattern work drawings.  I thought it was a paper bag type dress from the picture, but it is actually petals sewn to the bodice front.

Simplicity 2265


 I really like this dress and how it came out, though I did stray a lot from the instructions.  I wasn't impressed with them anyway.  I love reading how people don't look at the instructions to make things.  I am not someone that just takes the pattern pieces and starts to sew (except for the Ottobre magazines where I don't have the English instructions).  I always read them and try to figure them out, and even if I don't follow them, I still follow along when I'm on similar steps.

I made the dress in a width of size 1 and a length of size 3, and the first thing that my mostly non-verbal Bear Cub said when I put it on her is, "It's too big" (which is one of Darth Baby's favorite sayings), but she's right, the dress straps don't stay on her shoulders well and the second that one of them edges itself off her shoulder, the whole dress starts to fall off her.  I'm going to have to take the bodice in two inches and I'll bring the straps in at the same time.  Also those petals fall right over.  I've already tacked them a few more times than the pattern asks for, and I'll be adding more tacks when I modify the dress.  I do think it's a lovely dress and would even consider making it again.

Once again, I had to catch the bear cub in motion.